This is the second in a series of reflections on publishing in geography, which we’re sharing as part of PGF@Home. You can find part one here, and part three here.
In the first blog on this topic, I looked at the basic principles of academic publishing, focusing on questions of what, why, when, where and how you might go about publishing in geography as a postgraduate. This post considers what to do after you have worked through all these questions, looking at the practicalities of actually getting your paper submitted to a journal and in front of an editor. To do this, you will need to prepare a manuscript, navigate a set of online systems and new terminologies, and ultimately deal with editor and reviewer comments. This is something that may be particularly daunting the first time you do it (and given that I still get emails about it from senior academics, often remains so!)
This post will be much more of a ‘how to’ guide than the previous one. My aim is to walk you through the process, and offer some key hints and tips to make things smoother. Much of the information and advice here comes directly from my own experience, both of submitting manuscripts and from working with the RGS-IBG journals. It is swayed towards those journals therefore, but the basic principles are the same and so much of the information will be transferable to other journals and systems.
Preparing a manuscript
Once you have decided on what you will write and which journal you want to submit to, you will need to prepare the manuscript and other relevant documents for submission. Each journal has slightly different guidelines for their manuscripts. All this information will be contained within the ‘Author Guidelines’ on the journal’s website. My suspicion is that most people only look at the author guidelines closely after they have written the paper (which is what I used to do), but I would say it’s really worth doing this early on, before you start preparing your manuscript to send to the journal. In particular, I would look at four key things.
- The length of the manuscript.Each journal has its own target length for a regular research paper (and often a different length for other types of submission). For the RGS-IBG journals for instance, Area has a 5,000-word limit, The Geographical Journal, an 8,000-word limit, Transactions, a 10,000-word limit and Geo asks for anywhere between 7,000 and 10,000 words. Crucially, unlike most coursework/dissertation/thesis submissions, these word-limits do include the reference list. The journal might also assign figures and tables a word length (e.g. 250 words per figure) so you need to factor these in as well. If you exceed the word limit, there is a chance that the journal will not look at the paper, so it is vital that you stick within them.
- Figures and tables. Not all papers include figures, maps, and tables, but many do. Alongside the word allocation therefore, it is also important that you check the requirements for image resolution and know that journals may not be able to accept your figures if they do not meet this. For the RGS-IBG journals, we ask that all images are of resolution at least 300dpi, and that all line art is 600dpi. We also print most of our images in black and white (colour online), so it is worth thinking carefully about how your diagrams will look in both formats. Ensuring this quality is therefore something that you might want to think about carefully. It might be necessary to acquire a better camera, rather than just take photos on your phone, or to have the maps and diagrams drawn professionally, rather than doing them yourself (many universities will have someone who can do this for you if required).
- References. Whilst many geography journals use a version of Harvard referencing, not all do and it’s worth looking carefully before you start writing your paper. Similarly, even when using Harvard referencing, different journals have a habit of using slightly different styles of it. One of the best tips I have for managing this is to use a reference manager, such as Endnote, Zotero or Mendeley. Many journals have their styles as templates for these platforms and it is much easier just to select a different option when writing for a different journal than it is to learn how to do a whole new style of referencing.
- Headings and other general style notes. It might seem fairly mundane to look at the way in which a journal uses headings, but it can actually make a big difference to how you write your paper. The RGS-IBG journals for instance do not use a level 3 heading, e.g. a sub-sub-heading (except in very exceptional circumstances), which means that you must organise your material only using headings and sub-headings. There is nothing worse than having your paper sent back to you, asking for a rewrite because you used too many heading levels!
Depending on the approach the journal takes to peer review, you may also have to anonymise your manuscript. As discussed in the previous blog, some journals use blinded peer-review, where the reviewer does not know who the author is. In these cases, you may need to adapt the manuscript when you submit it to hide these details. The most common details that get anonymised are your university, any reference to colleagues, and any earlier publications. In all cases, I would just use “XXXX” or “Author” (bolded and highlighted red) to show that you have missed out a piece of information for anonymity’s sake. If you are unsure whether it needs to be anonymised, better to err on the side of caution.
Uploading a paper into the journal systems.
Journal submission systems can be confusing. There are no two ways about it. They often use terminology that is new to you and require you to fill out information that you may not have considered before. In this section, I will therefore walk through the process of submitting a paper to an RGS-IBG journal, explaining each step and the terminology as I go.
Before you start: If it is the first time you have published in a journal, you will need to sign up to whichever system the journal uses (the RGS-IBG use ScholarOne Manuscripts).The system might also prompt you to sign up for (or use if you have one) your ORCID. ORCID gives researchers a unique identifier which can then be used to input their details into paper submissions and funding grants and is required by many journals. *It is also worth noting that if you are submitting a multi-author paper, you might want to collect the co-authors’ ORCIDs in advance, otherwise you will be chasing them for these, just as you are trying to submit.*
Step 1: The first things you will have to do is input the title and an abstract. These are both important as they will dictate how easy it is to find your paper. Consider other important aspects such as Search Engine Optimisation too; this page by Wiley provides a good guide to this. Think about terms you use to search for papers, or terms people might use to search for your paper, and make sure you include them. Papers with simple, clear titles get read more often.
Step 2: You will now need to upload your pre-prepared files. In general, there are four types of files that you might need to upload:
- The manuscript of the main text (sometimes anonymised)
- A title page with all the identifying information (i.e. author name and any acknowledgements)
- Separate files for each figure (usually in JPEG or TIFF format)
- Any appendices or supplementary information
Step 3: You will need to add keywords. These are words or short phrases that capture the essence of the paper and are used for categorisation and searching. As with the title, its worth considering your choice of key words carefully to enhance the on-line discoverability of your paper.
Step 4: Next you will be asked to confirm the authorship of your paper. If it is just you, this is easy, but if there are multiple authors then you will need to add the others in as well. You will also need to confirm the order of the authors and some journals ask you to specify what contribution each author has made to the paper. It is worth deciding all of this clearly in advance to avoid causing any unnecessary upset.
Step 5: Add in your suggestions for who might be asked to review the paper.The editor will not definitely choose these reviewers, but they are important because they give the editor a sense of what kind of academics you would like to read your paper. You can also suggest reviewers not to invite such as where there might be a conflict of interest.
Step 6: The final section of the submission asks for further details, such as cover letter, funding information, numbers of words and figures, a short abstract and a data availability statement. The cover letter in particular gives you a chance to introduce your paper to the editors and outline why it would be a good fit for the journal. No need to make it a long letter but do use it to pitch your paper to the editor.
Increasingly, journals ask you to provide an additional summary of the paper, either as a Graphical abstract (e.g. an image or diagram) which can either be one of the figures from the paper, or something else, or more commonly as a shortened abstract, or a set of highlights. As the next blog will explain in more detail, doing these well can really improve how frequently your paper is accessed and read, as such, it’s worth spending a little bit of time getting them right, rather than just typing anything into the system thinking it doesn’t matter.
Another new inclusion in some journals are Data Availability Statements. These are short statements that outline if the data that underpin your paper are available to others, and if so, how might they be accessed. If they cannot be shared for ethical or privacy reasons, it is ok to say that. My advice here would be to think about the access to the data in advance though, so that there is no added headache by the time you come to submit your paper.
Step 7: At the end you will be asked to check that your information is correct, and you will be shown the proofs of your manuscript that will be sent out to review. Check these carefully because there is nothing worse than realising you have made a silly error or typo, but if you do notice this after you have submitted, don’t worry about it too much. Editors and reviewers are people too, and they will know a silly mistake if they see one (many do not even notice).
Once you have submitted, give yourself a pat on the back and find a way to celebrate. Submitting is a great feeling, particularly if it is your first paper, so is something to revel in for a day or two at least.
What happens next…?
… Well mostly, you wait and try not to think about it too much. Journals have significantly different lengths of time in between submission and receiving the decision on a paper. For most physical science journals, its somewhere between 2 weeks and two months on average and for human geography journals, somewhere between 2 and 6 months on average (although in exceptional cases it can take even longer than this).
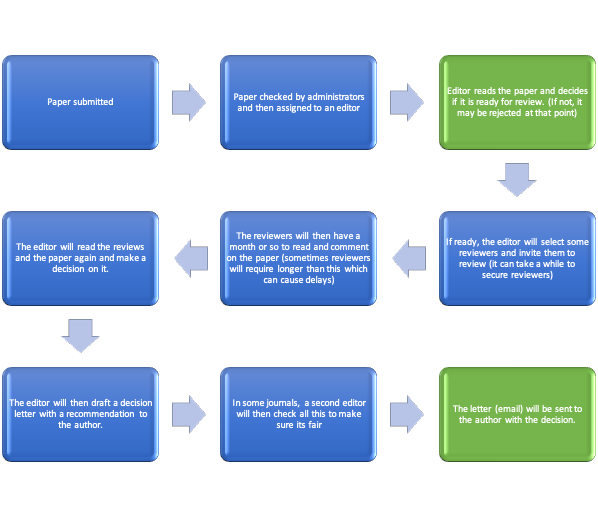
There are two different points in this cycle where you might receive a decision on your paper (highlighted green). The first is at the outset, if the editor decides not to send the paper for review — what is known as a ‘desk reject.’ Desk reject decisions are relatively common and are usually made because the paper does not fit well with the journal, rather than because it is a ‘bad paper.’ As such, you should not worry too much about it. I once received a desk reject on a paper and sent the exact same paper to a different journal, where it is now published. It turned out I had just sent it to the wrong journal the first time around.
The other point in the process where you will receive a decision letter is following review. At this point the editor can either accept, reject, or request a set of either major or minor corrections to it. This decision will be guided by the comments of a set of reviewers (usually two or three) which you will also receive. When making corrections, you will be asked to respond directly to the reviewers’ comments, although often the editor will also give you some guidance. The decision letter will stipulate the timeframe within which to do this – usually somewhere between 1 and six months.
Now it is important to say that reading reviewers comments can sometimes hurt a little, but that this is normal. You will have put a lot of effort into your paper and it is unlikely that the reviewers will agree with every single bit of it or not have questions they think it might be helpful to address. They may even want changes to sections that you thought were good. As such, my suggestion is always to read the reviewers’ comments when you receive them, check what the decision is, and then put them away for a few days to let them sink in. After a few days, you can return to them and read them again (they often won’t looks so harsh at this point) in order to start making a plan for how to address them. If the decision on the paper is a reject, it will hurt a little bit more; however, it is important not to lose heart. There are plenty of really great papers out there that have been submitted to, and rejected from, multiple journals before they find their final home. The key is to learn from each set of comments and try to improve the paper based on them before submitting the paper again and to take them on board when writing papers in the future.
If you are asked to make corrections, it is important to look carefully at the comments and think about how to resolve them. There are several ways you can approach this; however, my favourite is to create a table with five columns and then add in each specific comment to it. An example of this table is below. Doing this, will not only allow you to see all of the tasks that you have to do, but it will also help you keep track of what you have done so that it is easier to explain when you resubmit the paper. I personally start with the easiest and quickest comments first and then tackle the harder ones at the end, because I think this makes the task feel less daunting.
| Section of the paper | Reviewer | Comment | Initial thoughts on how to tackle | What I have done |
| Introduction | 1 | “Could you add a sentence to provide further context about the case study” | I can do this easily | I have done this on page 1 of the manuscript |
| Literature review | 2 | “I think you need to include a major discussion of the literature on…” | I will need to read much more about this. I also think that I might have to include this information throughout to keep the flow of the paper. | I have yet to tackle this. |
Once you have tackled all the comments and pulled the manuscript back together into its revised form, you will need to resubmit it as above. The only difference this time is that you will also have to outline your response to the reviewers in the submission. This is where the table comes in handy again, because you can just remove the fourth column and you have a ready-made response to reviewers. I always find it polite to top this with a brief note thanking the editor and the reviewers for their input and giving a broad overview of the changes made. This will help the editor (and the reviewers) to see exactly what you have done to respond to their comments.
From this point the process starts again and will go through the same steps. All the options are open to editors for revised manuscripts so you might get further corrections, which you should then respond to in a similar way. If you keep going like this, eventually you will have your manuscript accepted, and that is cause for real celebration (particularly if it is your first one)!
Yet, this is not the end of the process, given that once you have had the paper accepted, you want it to be read widely and by the right people. There are several techniques and tips to help this, and the next post in the series will discuss these in more detail.
About the Author: Dr Phil Emmerson is the Managing Editor for Academic Publications at the RGS-IBG. He completed a PhD at the University of Birmingham in 2018, where he also worked as a Teaching Fellow in Human Geography until 2019. Phil has published academic papers in Cultural Geographies, Environment and Planning A, Transactions of the Institute of British Geographers, and Area.
For more information on publishing, please see the RGS-IBG’s “Publishing and getting read: A guide for researchers in geography” (2017), available for digital download here.